
One of the challenges around extending vCAC is getting it to easily run a Workflow or another operation while a virtual machine is being provisioned.
Traditionally, in vCAC 5.2, one would typically use the Designer and inject a custom Activity, written in C# / .NET into the Repository.
Update: This post is a little out of date, since things are now done a little differently in the newer version of vRA (6.2 and greater). This relates less to vRA and more to the vRO plug-in itself that has changed a little. I should probably post an updated blog article, and I'll plan for this in the near future once my lab is up and running in vCA.
There are still actually a multitude of ways to achieve this, but the best way forward (and probably the way it will have to be done in future) is to use vCO.
My reluctance to use the Designer to reduce complexity (and probably because the product will likely steer away from any typical Microsoft dependencies. The benefits of using vCO are numerous.
It mean we don't have to employ any .NET skills anymore, and we also don't need to tinker with XML files, not inject custom assemblies into the Repository.
Enter: vCO integration
I can take no credit for any of the code in the Workflows I am about to present - this was, in fact, written by a very clever colleague of mine who will remain nameless for now.
Remember, for IaaS, there are typically 3 servers involved: Identity, vCAC VA and the vCAC IaaS Windows machine.
On the vCAC VA, you will find an embedded vCenter Orchestrator Server!
Using this server, we can access all of the workflows listed in this post.
Step 1: Configure vCO for vCAC Integration.
Step 1a: Add a vCAC Host
The first thing we need to do is configure vCO.
Open up vCO Client, connect to the vCAC VA and open up in Design Mode.
Browse through the Workflows and you will find a folder "vCAC Automation Center".
In this folder, expand "Configuration" and then run "Add a vCAC host".

Enter any name for this Host (this is to help identify this host, in the event that you add another host along the line).

For the "Host" field, enter the FQDN of the IaaS (Windows Server) host. Not the vCAC VA.
Edit: If you want to avoid an SSL error, use the https:// prefix as well, for the host. Eg. https://iaas-host.corp.local. In my example above, I had already imported the SSL Certificate with the "Manage SSL certificates" workflow.
Then, for the Credentials on the next page, make sure you add either the Service Account for the Windows Services on the Windows Server, or the Admin user.
Note: This is not a SSO user, but a Windows user for the IaaS host.

In the last section of this particular step, below, enter the name of the domain that the IaaS host belongs to.

Step 1b: Run the vCO Customisations installation workflow
You'll find the next workflow for this step here:
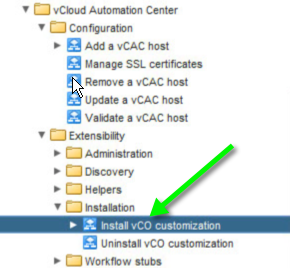
In the first dialog of this workflow (below), choose the vCAC host you just added above.

For the next step in the workflow, I just left all options at "Yes".
Remember, this means "For which of these states of a Virtual Machine's life cycle do you want the ability to assign vCO Workflows?".
I selected all of them, since I want the ability to customise every single state.

For the next step, I left the default settings:

Run the workflow, and you're done (if it's successful).
I had no issues running this. If you encounter problems, see the logs and variables pages, and you should have some more information related to the errors.
Step 2: Assigning a destination workflow to a life cycle stage
First off, you'll want to run the following workflow, called "Assign a state change workflow to a blueprint and its virtual machines".
What does this do? It enables you to run your own workflow whenever a Virtual Machine enters a particular state - very cool stuff!

For the next step, select the host you added in Step 1.

then, for the step below, assign the blueprints that you want to be "affected" by this workflow.
Any blueprints that you do not select, will not have these workflows run.
This is great if you want to assign different actions to different blueprints - such as Workflow A for Windows machines, and Workflow B for Linux machines.

Clicking "Insert Value" above, will bring up a dialog allowing you to select the Blueprints you wish to assign.
I selected a blueprint that I wanted to assign the customisation to, and proceeded as below.

For the next step in this workflow, select the workflow that you want to run whenever a machine from the blueprint(s) you selected is provisioned.
For the purposes of this tutorial, I decided simply to use the existing Workflow "Create / update property on a virtualMachine Entity". This particular workflow manipulates custom properties on Virtual Machines.

For the next step, selecting the option to add vCO workflow inputs as blueprint properties means that when you hit Submit, this will add Customer Properties to the blueprints you selected previously, and will add custom properties to them.
The benefit of this is that you can prompt users for their values. So, if, for example your vCO workflow expects a parameter "Project Code (string)", you could expose this as a Custom Property on the Blueprint, and prompt the user for it... Great stuff for customisations where the customers need vCO to integrate vCAC against existing systems!

If you now log into vCAC as an admin user (with the correct roles assigned to edit Blueprints), and open the blueprint you assigned a few steps prior, you should see the Custom Properties present, expected by the vCO workflow.

So, the next screenshot is pretty important. Here, from the above option "Add vCO workflow inputs as blueprint properties", we now have the following custom properties on the relevant blueprint.
The two most important ones in this particular instance are "propertyName" and "propertyValue".
These are expected by the vCO workflow (Create / update a property on virtualMachine Entity) I selected two steps prior.
Note that I have set them in this blueprint already - you could easily set them to prompt the user, or even add them though the Property Dictionary to prompt the user in a more user-friendly manner.
In my example below, I am trying to create a new Custom Property on every VM provisioned off the relevant Blueprint. In this case, the property added will be named "AdditionalNotes" and the value of the property will be "Inserted by vCO!!!".

Next, you can simply provision a machine as a user in your vCAC portal.
Once your request is successful, open up the vCO client and monitor the workflows.
You should see the workflow that you selected, run.
Once the machine has been provisioned, if you followed my example above, you will see the new custom property added on the VM by opening it and going into the Properties.
In my next post, to follow shortly, I will be focusing a little on creating your own custom Workflows within vCO, using the Workflow Template and guidelines for such Workflows.
I might even decide to include a use case for a call out to another service.